C R G CRG Reports Exterior Engine 1967 Model ID
Numbers Decode General Info Interior Transmission 1968 Model ID
Drivetrain Decode Options Underhood Chassis 1969 Model ID

CRG Research Report

CAMARO Manual Transmission Bellhousing Alignment
ARE YOU ALIGNED?

© 2007-2011, Camaro Research Group

Primary Author -
Reviewed by the CRG
Last Edit: 11-Feb-2007
Previous Edit: 08-Feb-2007
Original Release: 08-Feb-2007

Background

If you own a manual transmission Camaro, ask yourself this question, have I ever checked the bellhousing alignment? In most cases the answer is probably no. Many of us who restore Camaros install the clutch assembly, pilot bearing and bolt the bellhousing up to the engine block without even giving it a second thought. However, there is a very high probability that a stock (or aftermarket) bellhousing installed with stock engine dowel pins will not be in tolerance. How will this affect your car? Very simple - if the bellhousing is not concentric with the crankshaft within 0.005 inch, serious damage can occur to the pilot bearing in your crankshaft, and/or, the input shaft of your transmission. An alignment issue like this can also cause vibrations in your Camaro while driving under normal conditions as well as hard shifting.

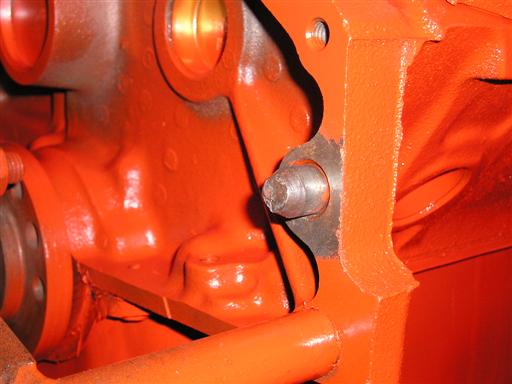
Shown below is a close-up shot of a stock Chevrolet dowel pin installed in the engine block, right side.

Stock Chevrolet Engine Block Dowel Pin
Stock Dowel Pin

As an example of the damage that can result from misalignment, the photo below shows a seized throw-out bearing stuck on the transmission input shaft bearing retainer. In this case, the bellhousing to block alignment was out of tolerance by 0.014 inch. This misalignment created excessive stress on the pilot tip of the input shaft, which eventually fatigued, broke off, and allowed the transmission input shaft to wobble extensively around in the crankshaft. This resulted in tremendous heat sufficient to cause the throw-out bearing to weld itself to the bearing retainer. When this happens the vehicle is not driveable at all. Note the broken ear on throw-out bearing from trying to remove the transmission.

Seized Throw-Out Bearing Due to Misaligned Bellhousing
Seized throw-out bearing

How and why does this happen? Chevrolet installs two alignment dowel pins into the block, locating one on each side where the engine block mates to the bellhousing. These dowel pins locate the bellhousing relative to the engine block, and the bellhousing - in turn - locates the front bearing retainer and input shaft of the transmission. For more than 99 percent of all production vehicles these components will mate together at the stock dowel pin position and function well enough for street applications. But in the world of performance cars, such as Z28, L30, L48 or an SS396 Camaro, misalignment can lead to serious issues, and can cause severe transmission problems. Every year Chevrolet Motor Division casts and machines hundreds of thousands of engine blocks, as well as bellhousings. Statistical variation in geometric tolerances will result in features of these parts that vary in true position from nominal. If an engine block is at the top of a tolerance range and the matching bellhousing is at the bottom of a tolerance range, a serious misalignment issue between the two parts can occur.

Chevrolet is willing to balance the risk of a small number of warranty issues for stock applications against the greater cost of 100% correction. Most people install the bellhousing on the dowels and install the bellhousing mounting bolts without checking the factory alignment. But we now know that GM does not do a sufficient alignment to assure full coverage of the tolerance band, even for stock conditions, and the factory alignment certainly does not cover high-performance needs. So it is left to you to check this during your rebuild.

How does one check their bellhousing alignment, and what does "concentric" mean? If an engine component is concentric with another part such as an engine crankshaft, this means that the centerline of the crankshaft is in perfect alignment with the centerline of the input shaft of your transmission. This also means that the input shaft of your transmission will ride perfectly centered in the pilot bearing of the crankshaft.

A Common Problem, and the Solution

Is this truly a common problem? During the writing of this article, and in support of it, Camaro Hi-Performance inspected three different engine blocks to check block-to-bellhousing alignment tolerances, using the same bellhousing as a control for all three evaluations. The blocks evaluated were two Chevrolet small block 3970010 castings and one Chevrolet small block 3914678 (all three coded as built for a manual transmission application). The results were disturbing. The same bellhousing produced three different out-of-tolerance concentricity measurements when it was mated to the three blocks. The concentricity for the 678 block, measured from the crank centerline, was 0.019 inch from nominal. The first 010 block was 0.016 inch out of nominal. And the second 010 block was out about 0.008 inch from nominal. Only the last block was usable as-is for normal street use because it was only 0.003 inch over the maximum desired value. And usable for street use means driving with no abuse to the drive train, high rpm shifts, etc. For a performance application even the best of these three blocks would have required correction to the bellhousing alignment. The other two engine blocks, however, urgently needed correction to bring them into the tolerance band required to avoid the drivetrain alignment issues discussed above.

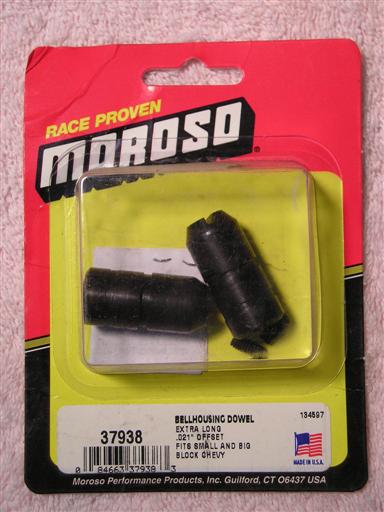
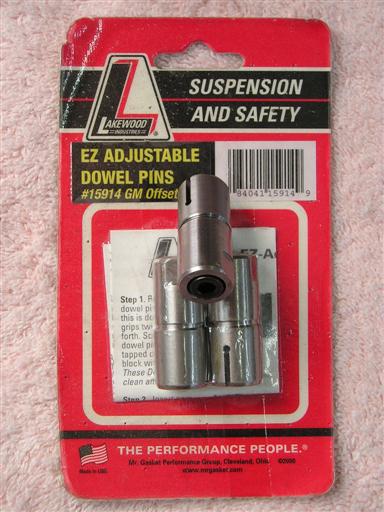
How is this correction made? By use of offset alignment dowel pins. Many variations and brands are available. Two of the popular brands of offset pins are shown below.

Typical Aftermarket Offset Dowel Pins for Correction of Misalignment
Moroso Dowel Pin Lakewood Dowel Pin
Moroso Dowel Pin SetLakewood Dowel Pin Set

Offset alignment dowels can be purchased at any parts store, speed shop, or performance center. They come in different alignment offsets starting at 0.003 inch all the way up to 0.021 inch. How do they work? One version has a slotted end at the end of the dowel for a flat blade screw driver. Once installed in the block, the dowels can be rotated in the engine block until you locate the correct offset to bring the bellhousing into tolerance.

How to Check Bellhousing Alignment

But before you will know which size of offset dowel pin you need, or if you even need one, you will have to tackle the issue of how to measure the concentricity between the engine block and the bellhousing.

Traditional Methods

For years, racers have tried to perfect this measurement task, but the traditional method is tedious at best. It takes a lot of patience and the right tools to do the job correctly. The traditional method measures the position of the bellhousing opening relative to the crankshaft, and requires a dial indicator, a magnetic base (for mounting to the crankshaft) and adjusting rods to mount the indicator into the base. You will then be faced with the fact that the bellhousing hole through which the transmission inserts is not a true machined surface; the dial indicator cannot ride on the bellhousing surface without the indicator needle bouncing around. This, of course, tends to yield inaccurate readings. For someone who is a machinist or has a machinist's background, there is no doubt that this method can be accurately applied, but it takes years of experience to perfect. For the novice, doing an alignment check this way can take hours and when you're finally finished the alignment might still not be within specifications. There is a much better and easier way to check your alignment, which is explained further below.

Shown below is a typical one-inch travel dial indicator mounted to an adjustment rod and magnetic base, capable of reading to 0.001 inch or better. This tooling setup is needed to do an alignment check by the traditional method. A correct bellhousing runout check by this method requires someone with experience as a mechanical technician or machinist.

Typical Dial Indicator on Rod/Magnetic Base
Typical Dial Indicator

In the photograph below, the magnetic base of the indicator stand is now mounted to the crankshaft, and the indicator rod is positioned on the inside surface of the bellhousing hole diameter. The crankshaft is then rotated (and the indicator rotates relative to the bellhousing at the same time) using a ratchet and socket on the harmonic balancer bolt. During this rotation, if the bellhousing hole is perfectly concentric with the crankshaft, the dial indicator needle will not move. If the indicator reading moves, and is biased to any clocking position by more than 0.005 inches, there is an alignment problem and offset dowel pins are required. Of course, the delicate issue in accurately making this measurement is that the surface roughness of the bellhousing hole can be several thousandths of an inch, which has to be ignored when assessing the bias.

Determining Bellhousing Concentricity Using a Crankshaft-Mounted Dial Indicator
Dial Indicator on Crankshaft

Making This Measurement Job Easy

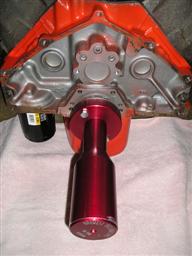
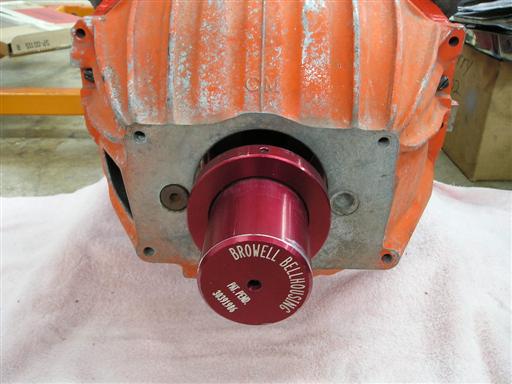
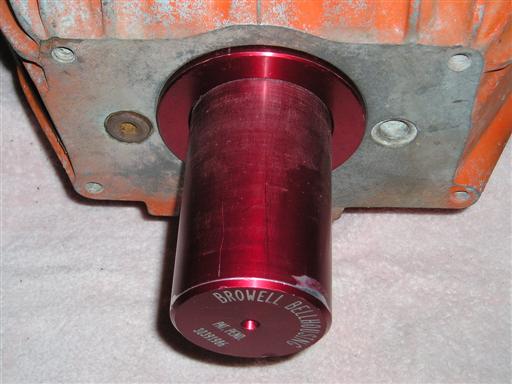
Thanks to a company called Browell Bellhousing, a tool is now available [1] to make this job easy and repeatably accurate, even for the relative novice. This tool looks similar to a bowling pin, as shown in the next two photos, and bolts to the flywheel flange of the crankshaft.

Browell Alignment Tool
Browell Alignment Tool Browell Alignment Tool
Components Assembled

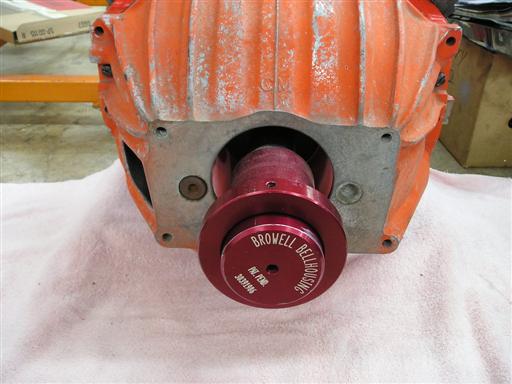
Once the tool is installed, mount the bellhousing to the block, as shown in the next three photos.

Browell Alignment Tool Pin Prior to Fitting Ring
Browell Alignment Tool Browell Alignment Tool Browell Alignment Tool
View 1 - Pin Mounted to Crankshaft View 2 - Down crankshaft centerline View 3 - View from above

Included with the bowling pin tool is a ring that slips over the large end of the bowling pin. The outer diameter of the ring is 4.6825 inch, approximately 0.0025 inch smaller than the hole in the bellhousing where the transmission throw-out bearing retainer installs. If the ring slips into the bellhousing hole without difficulty, you have good alignment that is within 0.003 inch. The next three photos show the ring sliding onto the bowling pin.

Browell Alignment Tool, Inserting Ring Onto Pin
Browell Alignment Tool Browell Alignment Tool Browell Alignment Tool
Starting point on pin Mid-way down pin Ring fitting into bellhousing hole

If the ring will not insert into the hole, there is an alignment issue. In simple terms, this gauge acts like a go/no-go gauge. By shining a drop light into the back side of the bellhousing, you'll be able to see a gap in the hole area when the ring is pressed up against the bellhousing. Think of the hole in the bellhousing as a clock. If there is light in the upper left side quadrant of the transmission hole, say at the 10 o'clock position, that means you want to move the bellhousing toward the directly opposite 4 o'clock position, which you accomplish by rotating the alignment dowel pins towards the 4 o'clock position. Or if there is light at the bottom of the hole at 6 o'clock, that means you want to rotate the dowel pins towards the opposite, 12 o'clock, position. The next photo shows the ring fully engaged in the bellhousing hole, ready for examination with the light.

Browell Alignment Tool, Examination of Ring Fit
Browell Alignment Tool

Once you have correct alignment, apply either red or green Loctite to the dowel pins so they will not turn in the engine block, and install the bellhousing.

Related Business: Replacing the Pilot Bushing with a Pilot Bearing

Chevrolet installed a solid bronze pilot bushing from the factory when these cars were new. Our experience indicates this bronze pilot bushing allowed for misalignment between the engine block and bellhousing. The bushings are very soft and wear easily and the transmission will still function under normal conditions. This was adequate for easy street driving, but in time, with wear from misalignment, the input shaft of your transmission will be wobbling around within a worn pilot bushing.

It is strongly recommended that anyone who is restoring a manual shift Camaro install a needle bearing pilot bearing at the same time that they perform the bellhousing dowel pin alignment. This bearing is available from Chevrolet under part number 14061685. Cost is about $18.00. Installing this pilot bearing, together with the mandatory proper bellhousing alignment, will add tremendous integrity, balance and smoothness to your driveline. Shown below are the stock GM pilot bushing (left) and the GM replacement needle bearing pilot bearing (right).

Pilot Bushing versus Pilot Bearing
Pilot Bushing vs. Needle Bearing

For serious racers or Camaro hot rodders, Jerico Racing Products has a ultra heavy duty pilot roller bearing. This design inserts into the larger end of the crankshaft moving it deeper into the pilot of the input shaft for added strength, as shown below.

Jerico Roller Pilot Bearing
Jerico Roller Bearing

Footnotes

[1]   The Browell bellhousing tool is available from Browell Bellhousing upon inquiry to anyone in the general public. All major applications are available: Chevrolet, Pontiac, Ford, etc. Cost at the time of this writing is about $125.


 CRG Home  Previous/Back
CSS Validated XHTML 1.0 Validated!