Thanks everyone for the very kind and informed input and feedback...
Oh my - where to start? Thank you very much Jon for the definitive sweep of Challenger seat installation photographs which will help my efforts immensely. I've poured a few extra seats to afford patch material to reposition the seat belt pass through holes, while I'm contemplating just how to better capture the upholstery detail stretching around the seat shell proper. Plastic coated wire will likely be employed for the structural seat lattice work, whereas your photos again will certainly be employed to better master the mounting hardware that has been fabricated up until now. I hope the Munchkin Mrk. I. seen seated inside the 1:1 #77 is doing well!
-
Indeed, with the 50th Anniversary of the old Can Am as well as the Trans Am arriving on the calendar a good many regional contest were so-themed or so sub-themed. Although there has always been a solid flow of high quality work done by various individuals across scales that is '66-'72 SCCA Trans Am themed, the increasing visibility of the old Trans Am combined with the arrival of new tools and occasional resin releases of note has seen more enthusiasts create such replicas. The Group 44 Dart seen in the above post looks quite nice - thanks for bringing our collective attention to it. Perhaps in time I will be able to find the same resin Dart.
-

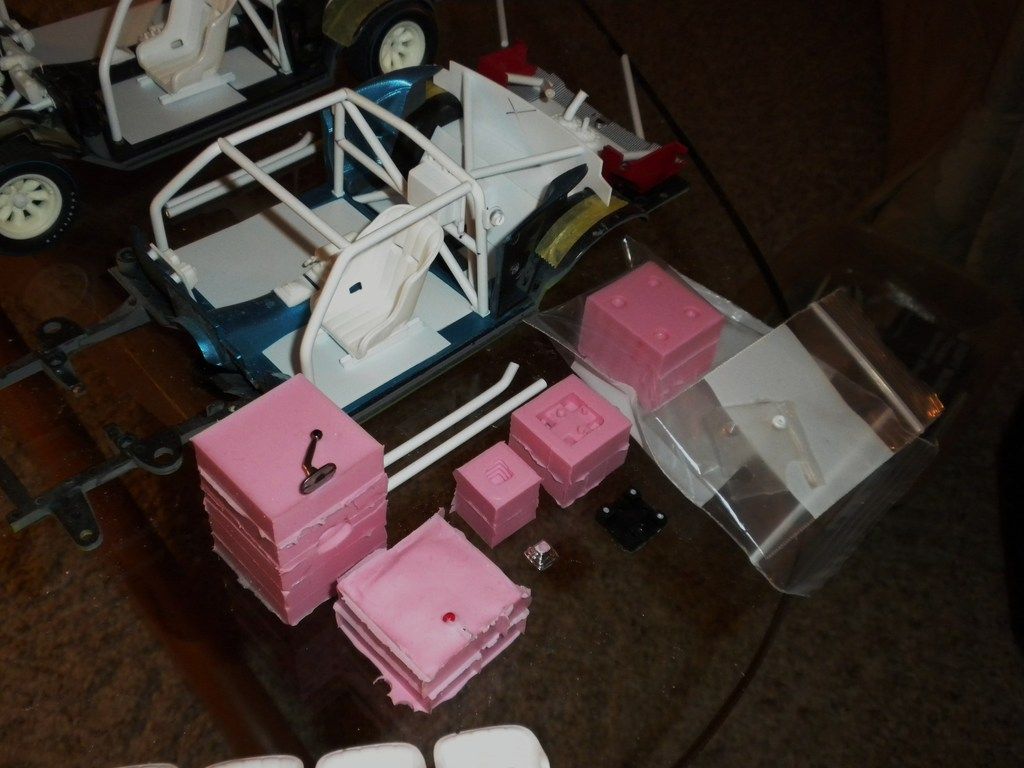
...and a mild update of sorts. Given that I haven't the equivalent of a stack of low-cost, unassembled 1:18th plastic kits to draw spares from, I must instead search intently for parts from damaged models or those on hand for items that might be copied, modified and copied, or in some instances scratch built to suit my needs and to push my projects ahead. What is seen in the photograph is a series of open face molds as well as two-part urethane molds I've worked up consistent with creating needed supplies. Employing such, GMP Trans Am Camaro Hurst shifter assemblies can be reproduced (to later be vacuum plated unlike the standard GMP issue), a Hurst reverse lock out lever is seen (employed on the AAR 'Cuda's then), while further seen is a Shelby Collectibles GT 350R shift boot that will overlay vacuum plated resin plates with small divots ground into the corners to vaguely represent set screws. Positioned in the middle is a new one-piece mold for a GMP Trans Am Camaro seat mount that I hadn't done up until now.
Also noticed will be the happy result of efforts to reproduce the signal light lenses specific to the race AAR 'Cudas and positioned on the roll cage main hoop positioned approximately two-thirds of the way up on either side. Tail lights from a 1:25th scale AMT 1968 Corvette which feature faint radial ribs across the surface and likewise come to a soft point as such were carefully cut out and isolated, whereupon the four I had were used to create the urethane mold seen on the far right. The mold was passed to a fellow scale enthusiast known for his quality 1:32nd scale period slot car windshield reproductions, who very kindly employed his methods to yield me extremely serviceable examples in clear resin.
In particular, clear resin mixed and poured at room temperature typically clouds for very small bubbles remaining visible in the mix, while drawing the material into any mold often proves problematic. For much trial and error effort, heating both the resin as well as placing the mold or molds employed in a toaster over across hours can ameliorate the problem, and thankful I am to be able to lean upon those who've done the arduous work necessary to perfect the problem at a cottage industry-level. Though difficult to make out, the results are fine indeed and happy I am for his evident knowledge and skill - kind thanks to Brad in SE Michigan. Again, thank you each for looking in and contributing in a personally valued way.
Mike K.